WAN Video Basic and more workflow with ComfyUI 「WAN Video の基本と応用ワークフロー」
in English
When using the video generation AI “WAN Video” by ComfyUI various easy workflows are available, including EasyWAN. However, many of the node configurations are too complex and it is difficult to understand what they are actually doing.
On this page, we will look at the basic workflow of WAN and how extensions can be easily added.
There are two types of WANs, Text to Video and Image to Video, and we will discuss Image to Video, which generates video from images.
1. Basic
The simplest workflow for WAN Image to Video (hereafter referred to as I2V) is the following image.
This workflow is included in the ComfyUI templates; click Browse Templates from Workflow in the ComfyUI menu to display the template list screen. Select Video from the list on the left, then select WAN 2.1 Image to Video to see the same workflow.
For those who are used to seeing huge workflows like EasyWAN, it is very simple, or rather, it is structured almost like a simple Image to Image workflow such as SDXL. If you don't add any features, this is all you need to generate video.
The most important difference from image generation is the WanImageToVideo node in the middle of the workflow. By setting the length of the image or video to be loaded here, a video is generated.
Now, the following are the actual results generated using this workflow. On the left is the input image and on the right is the generated video.
The changes from the default workflow include: the size is 480x848, the prompt is “a woman wearing a princess dress outfit turning around.” and since my PC is not that powerful (GPU: RTX5060ti 16GB RAM: 64GB), I have downgraded the model to WAN21_I2V_14B_480p_fp8_e4m3fn.
The VRAM was still just under 15 GB, and it took 14 minutes and 00 seconds to generate the image.
2. Change workflow to take advantage of various features
If your PC is not powerful enough, the current workflow is not practical for your needs, so let's change the workflow to one that allows you to add features.
To make it easy, all we need is a custom node ComfyUI-WanVideoWrapper.
kijai/ComfyUI-WanVideoWrapper
Contribute to kijai/ComfyUI-WanVideoWrapper development by creating an account on GitHub.
The following is a workflow that uses the sample on that page and EasyWAN sample, with changes made to the basic workflow described earlier. The nodes that have been changed or added are colored purple. Clicking on this workflow image will bring up an image saved on Google Drive, from which you can download it and drag and drop it into ComfyUI to reproduce the workflow.
In the workflow, there is a yellow node called Unload Model, which releases the memory of the clip model when it has been used, so it is expected to reduce memory usage.
Although most of the nodes have been replaced, the flow remains the same and should be easy to understand. Note that this is just an example of a workflow and there are many ways to do it.
Now, there are two nodes of interest here: WanVideo Model Loader and WanVideo Sampler.
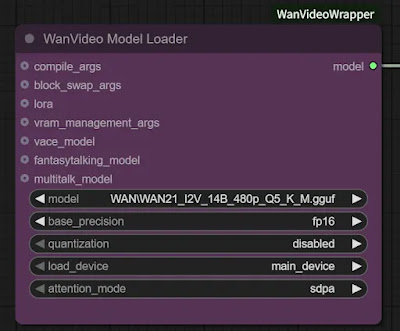
The WanVideo Model Loader node allows you to switch between both the regular and GGUF models; when using GGUF, the quantization entry must be disabled.
You can also speed up the generation time at the expense of some stability by selecting sageattn (Sage Attention) in the attention_mode item of the WanVideo Model Loader node.
The WanVideo Sampler node comes with a lot of options that can be connected and various functions can be easily added. This will be explained in another article.
After setting up the workflow, I found that this flow seems to consume more memory than the basic flow described earlier, and WAN21_I2V_14B_480p_fp8_e4m3fn caused an Out of Memory (OOM).
Switching the model to WAN21_I2V_14B_480p_Q5_K_M.gguf and running the generation, the VRAM consumption was 15 GB, still just barely enough. Generation time was 12 minutes 59 seconds with spda and 8 minutes 20 seconds with Sage Attention.
The video generated by pda is on the left and Sage Attention is on the right.
Comparing the behavior, the difference in model size really shows. Personally, however, I think this is acceptable.
In the next article, I will explain additional functions of WAN using this workflow.
日本語解説(in Japanese)
ComfyUI で動画生成AI「WAN Video」を使用する場合、EasyWAN をはじめ様々なお手軽ワークフローを利用できます。しかしノード構成が複雑すぎ、実際のところ何をやっているのか分かりにくいものも多くあります。
このページではWANの基本的なワークフローと、拡張機能を簡単に追加できる仕組みを見ていきます。
尚、WANには Text to Video と Image to Video の2種類ありますが、画像から動画を生成する Image to Video について解説します。
1.基礎
WAN Image to Video(以下、I2V)の一番シンプルなワークフローは以下の画像となります。
このワークフローは ComfyUI のテンプレートに入っています。ComfyUIメニューの Workflow から Browse Templates をクリックすると、テンプレート一覧画面が表示されます。左側の一覧から Video を選択し、 WAN 2.1 Image to Video を選択すると同じワークフローが表示されます。
EasyWANのような巨大なワークフローを見慣れている方からすると、非常にシンプルというか、SDXLなどの Image to Image のシンプルなワークフローとほぼ同じような構成になっています。何も機能を足さないのであれば、これだけで動画が生成できるのです。
画像生成と一番違う点は、ワークフロー中盤にある WanImageToVideo ノードです。ここで読み込む画像や動画の長さを設定することにより、動画が生成されていきます。
さて、このワークフローを使用して実際に生成してみた結果が以下。左が入力画像、右が生成された動画です。
デフォルトのワークフローからの変更点としては、サイズを480x848、プロンプトを "a woman wearing a princess dress outfit turning around." に、また私のPCはそんなに高性能ではないため(GPU:RTX5060ti 16GB RAM:64GB)モデルを WAN21_I2V_14B_480p_fp8_e4m3fn にグレードダウンしています。
これでもVRAMは15GB程のギリギリで、生成にかかった時間は 14分00秒 でした。
2.色々な機能を利用できるようにワークフローを変更する
PCの性能が高くない場合は現状のワークフローでは実用性に乏しいため、メモリに余裕を持たせる機能や、GGUFモデルを使用できる機能を追加できるようなワークフローに変更していきましょう。
簡単に済ませるために必要なのはカスタムノード ComfyUI-WanVideoWrapper です。
kijai/ComfyUI-WanVideoWrapper
Contribute to kijai/ComfyUI-WanVideoWrapper development by creating an account on GitHub.
そのページにあるサンプルとEasyWANを手本に、先ほどの基本的なワークフローに変更を加えたワークフローが以下です。変更・追加したノードは紫色にしています。このワークフロー画像をクリックするとGoogleドライブに保存された画像が表示されるので、そこからダウンロードしてComfyUIにドラッグ&ドロップすればワークフローが再現できます。
ワークフローの中に黄色の Unload Model というノードがありますが、使い終わったクリップモデルのメモリを解放してくれるノードなのでメモリ使用量削減に期待できます。
ノードの大部分は置き換えられていますが、流れは変わっていないため分かりやすいと思います。ただしこれはあくまでワークフローの一例なのでやり方は色々あるということに注意してください。
さて、ここで注目すべきノードは WanVideo Model Loader と WanVideo Sampler の2つです。
WanVideo Model Loader ノードを使用すれば、通常のモデルとGGUFモデルの両方を切り替えて使うことができます。GGUFを使う際は quantization の項目を disabled に、通常モデルの場合は対応する文字列にする必要があります。
また、 WanVideo Model Loader ノードの attention_mode の項目で sageattn (Sage Attention) を選択すると、多少の安定性を犠牲にして生成時間を早めることができます。
WanVideo Sampler ノードには接続できるオプションが沢山ついており、様々な機能を簡単に追加することができます。これは別の記事で解説する予定です。
ワークフローを組んでみて分かったのですが、このフローは先ほどの基本的なフローよりもメモリ消費量が多いようで、WAN21_I2V_14B_480p_fp8_e4m3fn では Out of Memory(OOM) を起こしてしまいました。
モデルを WAN21_I2V_14B_480p_Q5_K_M.gguf に切り替え生成を実行すると、VRAM消費量は15GB、やはりギリギリ。生成時間は spda で 12分59秒、 Sage Attention では 8分20秒でした。
spda で生成された動画が左、Sage Attention が右になります。
やはり挙動を比べるとモデルサイズ差が如実に出ているなといった感じでしょうか。しかし個人的には許容できる範囲かなと思います。


